Sunday, September 23, 2012

Homemade Laundry Detergent

A long while back, I was browsing Pinterest and saw a recipe that was repeatedly posted for homemade detergent.  I thought, hey, I should try that because it is one more way that I can make my family more self sufficient (plus, it is supposed to save you a lot of money).  Well, I waited and waited to actually make it because it seemed silly to me make a huge vat of detergent when we were about to move (I highly doubted out movers would move it for me).  So, once we got settled into our new home and I ran out of store-bought  detergent, I decided it was time.  I bought all of my ingredients and once my kids went to bed, I whipped up a batch.

Now I just want to make a quick disclaimer.  I love store bought anything.  I'm not a crazy person that thinks that people who make their own things are better than others.  Really, I don't.  However, I love trying new things.  Also, I belong to a church that asks us to be prepared.  So, I wanted to learn how to make detergent in case something ever happened and I could no longer buy it at the store.

With that out of the way, let's get on to the results.  The homemade detergent works well, but I wouldn't say it is super fantastic.  I don't think it is any better than store bought detergent.  I'm not sure if I will make it again.  However, it does save a ton of money on detergent.  I made a batch back in July and I still haven't even used half of it, maybe not even a third.  It only costs about $20 to make and can last about 9 months (depending on the amount of laundry you do).  My mother told me about a homemade detergent that my aunt made that was a liquid and not powder detergent.  I think I may try that next.  If I don't like that any better, I will probably go back to store-bought detergent for a while.  However, if I ever need to make detergent, I can and I know it will work.

You can see the post and recipe I followed here (Being Creative to Keep My Sanity).

Here are the ingredients that you will need.:


1-4 lb 12 oz box Borax (76 oz); found in the detergent aisle
1-4 lb box Arm & Hammer Baking Soda; found in the baking aisle
1-55 oz box Arm & Hammer Super Washing Soda (3 lb 7 oz); found in the detergent aisle
3-bars of Fels-Naptha soap; found in the detergent aisle
* optional: 2-small containers of Oxy Clean (or generic equivalent) (about 3.5 lbs total); found in the detergent aisle

First, start by shredding your Fels-Naptha soap.  As I went to do mine, I realized that every single grater/shredder that we had went missing in our move.  So, I had to by a new one.  Knowing what I had to do, I bought one of those snazzy round shredders that they use for parmesan cheese in restaurants.  It made the shredding go so much quicker.  However, the soap took a while to clean out of the shredder (so, I don't know how much time I actually saved, but it saved me on energy).
*Tip 1: Use a big 5 gallon bucket lined with a trash bag to mix your batch.


After, you have shredded your bars of soap.  Add all of the ingredients to your bucket.  Mix well (seriously, mix really well).


You'll have yellowish/orange spots mixed in.  This is the bar soap.  Don't worry, it all works fine in the washer.


I transferred mine into this clear glass container that I had used for flour in my old house.  I kept it empty knowing that I wanted to put my detergent in it.


You need to use 1-2 Tbs of detergent per load of laundry.


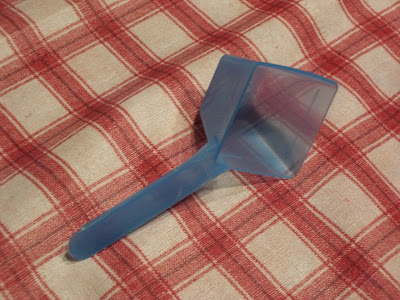
I found that the scoop that went with small container of Oxy Clean was the perfect size.  The line just below the rim is 2 Tbs, so I fill it to that line, or just below for a smaller load.


Everything fits perfectly in my container (you can get the same one at Walmart in the kitchen items aisle.  This is the giant one).


And voila, homemade laundry detergent.


There you have it.  Like I said, it works well, but it isn't my favorite.  It doesn't leave your clothes with a strong clean smell (but you can always change that by using fabric softener), but it does leave them clean.

Tuesday, September 18, 2012

Wow! It's September!

Goodness gracious me!  Where has the time gone?  Well, let me tell you.  We spent the summer moving to a new state.  We started with house hunting, which took up most of May.  Then we started moving.  After we moved, the hubby and I celebrated our anniversary, then we started family reunioning.  What?  Family reunioning isn't a word?  Hmmm...I'll think about that.  But the way that we did it, I think that makes it a word.  We had 2.5 family reunions back to back.  How do you have a half of a reunion.  Well, short answer, we had one family reunion that was actually two small ones put together.  Anyway, once we finished family reunioning (yes, I will continue to use that word), we went back to our new house (which also happens to be the first home that we've owned) and tried to get settled.  That plan was interrupted with the sudden death of one of my grandmothers.  I quickly made arrangements for the kids and whisked my baby off to a funeral. I got back in time to get my oldest kids registered for school.  So, then we were busy getting ready for school.  I got them off and ended up getting two more in return twice a week (I'm watching a friend's toddlers for her).  Needless to say, I've been busy.  However, I think I may be getting settled, so I figured it was time to update my loyal fan base (all 6 of you?).  I was able to do a few things here and there in between all the business that I'll share with you over the next few days.

The first I'm going to share with you is a sleep sac.  My oldest's best friend wanted a sleep sac for her birthday.  She's 8.  Her mother asked if I would make her one as our gift.  I've never created a pattern before, so I was a little nervous.  I used a baby sleep sac and one of my oldest's t-shirts as templates.  I then used some plain brown paper to make a three piece pattern.  One piece was for the front, one for the back, and one for the feet.  It didn't turn out exactly as planned (I'm a perfectionist), but it turned out better than I had hoped for (as I mentioned above, I'd never created my own pattern).  So, here we go:

1. First I gathered all of my supplies.  I had my baby sleep sac for guidance.  My brown paper to draw a pattern.  A ruler and straight edge to help me draw my pattern, and obviously a pencil.  I measured my daughter, so that I'd know how long and wide I needed to make the sleep sac.


 2. After drawing out a pattern (don't forget to take into account seam allowance in your measurements), I cut it out.  You can see that I made the foot piece into a football shape.  It needed to be wide in the middle to allow room for feet, but I wanted it to taper at the sides so that it would be easier to attach to the body.  I made my front wider than the back to allow for a zipper.


3.  Before I did anything else, I made notes on my pattern, so that I wouldn't get my pieces mixed up.  I also wanted to remember how much seam allowance there was and which pieces needed to be cut on a fold.


 4.  I sewed my two front pieces to the back (right sides facing in).


5. Once I had the front and back connected, I added the zipper to the front.  It went on quite easy.  It wasn't a full zipper, so then I finished sewing the two front pieces together.


*The next few steps don't have pictures.  I got really excited on how it was turning out and forgot to take anymore.

6.  Next I added the foot piece.  My shape wasn't perfect, so I had to rearrange things as I sewed it to the body.

7. The final step was the arms and neck.  My friend wanted it sleeveless (which was easier for me), so it wasn't too difficult.  Originally, I attempted to using bias tape for the sleeve and neck line to make it look more finished.  It looked awful.  So, I took it all off and just did a simple hem around both arm holes and around the neck.  Much better.  And voila.  We have an 8-year-old size sleep sac.

Look for my upcoming post on homemade laundry detergent.